General Calendar Instructions
Logging into the calendar
- Go to http://www.baruch.cuny.edu/calendar/ or click “Calendar” from the Baruch homepage
- Click “Submit Events”
- Click “Administrative login”
- The username/password is the same as the one you use to login to the computer (Active Directory)
Adding an event to the calendar
- In the calendar service, click the "Events" tab

- Click "Events: Add". This will bring you to the "Main Information" tab for your event.

Main Information Tab

Fill out the event name.
- For "Publish on Selected Calendar(s)", you may have the following options described below. If you are unsure of what to select but would like your event to be visible on the public calendar, select "Public".

- Select - This will not display your event anywhere on the calendar. This option should only be used if you only wish to book a facility, but do not wish to have event information anywhere on the calendar.
- Public - This will display the public categories available to you and will display your event on the public calendar (http://www.baruch.cuny.edu/calendar) under the category you specify.
- Private - This will display the private categories available to you. These categories are not exposed on the public calendar, but the event may be accessible through the private calendar and through direct links to your event.
- Both - This will display the public and private categories available to you. You will need to use this option if you wish to select multiple categories that are from both public and private categories for your event.
- Select the category/subcategory that best fits your event with the drop-down menu.
- If there are multiple categories the event applies to, click "Select Multiple" for the category selection. If you select this option, a screen will pop up where you can check off the categories you want the event to be under. Check those off and then click "Submit".

- Fill out the event description
- For the event date, start time, and duration, you can opt to fill it out here or in the next screen under "Scheduling & Facilities".
- Click the next tab "Scheduling & Facilities" to proceed to the next screen.
Scheduling & Facilities Tab
The Scheduling & Facilities tab is where you can book a facility or facilities for your event date(s). If you are not the Space Manager (owner) of the facility or facilities, a facility request will be sent to the Space Manager of the requested facility after you finalize your event. Your event will not be published in the calendar until the Space Manager approves your facility request.
For more information regarding this workflow, please visit the Active Data Calendar Space Reservation Workflow guide.

- You will see three options at the top when on the Scheduling & Facilities page. Only the first two options are relevant.
- Select Event Date(s) - (No Facility Required) - Pick this option if your event does not have a room.
- Select Event Date(s) to find available Facilities - Pick this option if you want a room for your event.
NOTE: Classrooms included in the calendar do not currently include academic class schedules so availability information will not be accurate. Availability of classrooms can be confirmed by the Office of the Registrar.
- If you filled out the event date, start time, and duration on the "Main Information" tab, you will find it populated on the screen here. If you did not, fill it out the Start Date / End Date fields and the Start and End times under "Event Time(s)".
- If you have multiple dates for your event, you may click "Custom Schedule" to pick out the dates your events fall upon. In the image below, we select March 26, 29, and the 30th.

- After you've selected a facility option and start/end dates, click "Generate Schedule".

- If you would like the event to only be displayed during a certain date range, visible after a certain date, or hidden from the calendar after a certain date, fill out the following section that will be displayed after clicking "Generate Schedule":

- You will now see a list of your event date(s) and time(s) under "Current Schedule". You may correct the start/end date(s) and time(s) here if necessary.

- Please read the appropriate section below depending upon the facility option you've selected.
Select Event Date(s) - (No Facility Required) Option Selected - You do not need a room for your event
- If you've picked "Select Event Date(s) - (No Facility Required)", you can proceed to the "Details & Registration" tab to finalize your event details.
Select Event Date(s) to find available Facilities Option Selected - You want a room for your event
- If you've picked "Select Event Date(s) to find available Facilities", check off the event date(s) you wish to book a room for under "Current Schedule". Note that you may only book the same set of rooms for the selected dates so if you have three dates in three different rooms, you will go through this process three times.
- Once you've selected your event date(s), scroll down and you will see the "Facility Search" area and some other options (room type, features, setup). You can either type in a particular facility you wish to reserve in the Location Keyword Search ("14-250") and click "Filter Facility Checklist" or check off the rooms you wish to search and then click the blue "Search" button.
If you are not sure which room you wish to book, you can check off "Baruch College" and click the blue "Search" button to see a full list of all rooms available.

- Once you've selected a room, click "Search". You will then see a new area called "Available Room(s)". Click the checkbox under "Select" for the room and click "Save".
Some rooms may have setup options that describe how you wish for the room to be arranged. Some rooms may also have setup and tear down times. If the room is a Conference Services owned room, please do not modify these times. For non Conference Services owned rooms, the setup time is how much earlier you need to be in the room to prepare and the tear down is how much later you need to be in the room to clean up.

IMPORTANT - If you receive an error after searching the room that states, "There are no rooms that match your search criteria or can be scheduled for this event.", this means that the room is not available for your request event date and time. You will have to search for another room.
- You should see the room now listed in the "Schedule Facility Booking(s)" area. This means the room is now attached to your event and you can proceed to the "Details & Registration" tab to finalize your event.
You can also remove a room in this area by clicking the tab with the room name you wish to remove and then clicking "RESET".

- Repeat this process for any other event date(s) that may need a room.
- To confirm that all event date(s) have rooms associated with them, scroll down to the "Schedule Facility Booking(s)" area. If you see a tab labeled "Unbooked", the number in the parentheses indicates how many event dates do not have a room. If you click this tab, it will display the event date that does not have a room.

- Once you've confirmed that your event date(s) are properly booked, proceed to the "Details & Registration" tab to finalize your event details.
Details & Registration Tab

- Fill out the contact information. For the other boxes under "Other Event Information", check them off if it is appropriate for your event. For example, if it is a school or department event, check off the school or department that is holding it. If you do not find your school or department in the list, please send a request to the BCTC Help Desk to have this added.
- If you would like your event listed in the CUNY Calendar (http://events.cuny.edu/ ), select "Yes. Make this event visible in the CUNY Calendar" for the "Promote in CUNY Calendar" box, otherwise select "No. Do not make this event visible in the CUNY Calendar".
If your event is in a private category or "Select", select "No. Do not make this event visible in the CUNY Calendar" as private events and select events are not published to the CUNY calendar. - If attendees will be charged for your event, check "Yes", otherwise "No".
- For the "Rate Category", please see below:
- If your Dean/VP has not given you a rate category, you should set it to "TBD by Dean or VP".
As part of the Space Policy, you must get a rate category from your Dean/VP. You must save the event afterwards and send your event information to the Dean/VP.
- If your Dean/VP has given you a rate category for your event, you should set it to the rate category they've given you here.
- Click "Preview" at the bottom right of the screen.
Preview Screen
On the preview screen you can opt to save the event or release the event. See below for which option you should select.
- The "Save Event" option will not publish your event to the calendar or send a facility request to a Space Manager. An event should be saved when you have not received the rate category from your Dean/VP yet (Any rate category other than "TBD by Dean or VP") or if you are missing event information and wish to fill it in at a later time.
In order to receive a rate category from your Dean/VP, you must send them the event information by following the instructions further below.
The "Release Event" option will send a facility request to the Space Manager (if there is a facility requested) and publish your event to the calendar (if it's a public/private event).
If your event has a rate category of "TBD by Dean or VP" and it is released with a facility request, it will not be approved by the Space Manager. Your Dean/VP will give you a rate category for your event after you send them the event information. Steps for sending them the event information can be found further below.
See the appropriate section below dependent upon whether or not the rate category was given by the Dean/VP.
Rate Category was received from Dean/VP and set to anything other than "TBD by Dean or VP"
- Click "Finish" at the bottom right of the screen if you have a rate category set to anything other than "TBD by Dean or VP".
You have now successfully added an event to the calendar and a facility request will be made if you have requested a facility.
IMPORTANT - If your event is booked for a facility that you are not the Space Manager of, the event will not be published into the Calendar until the facility request has been approved.

Rate Category has not been received from Dean/VP and is set to "TBD by Dean or VP"
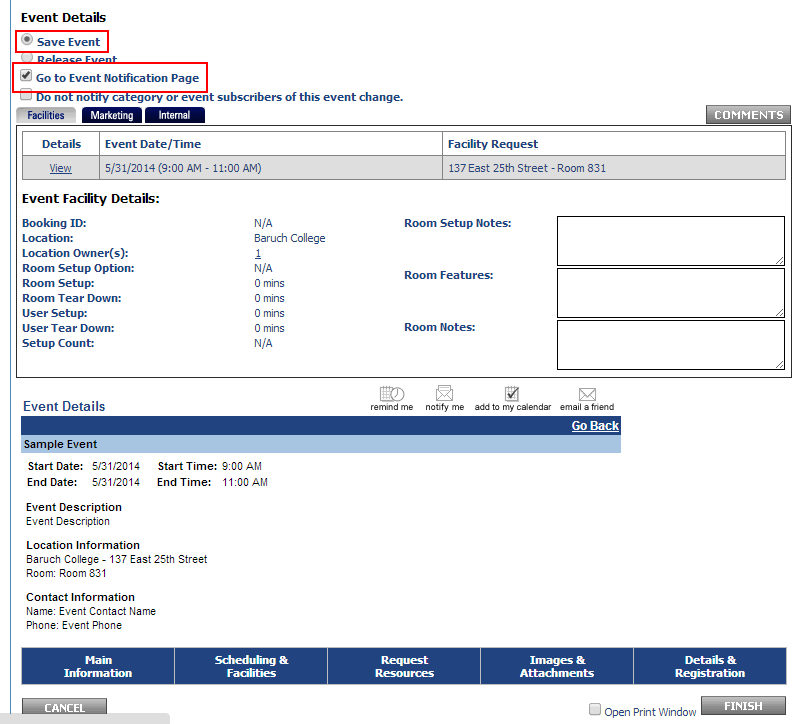
- If you have your rate category set to "TBD by Dean or VP", make sure your event is set to "Save Event" and check off "Go to Event Notification Page". Then click "Finish".
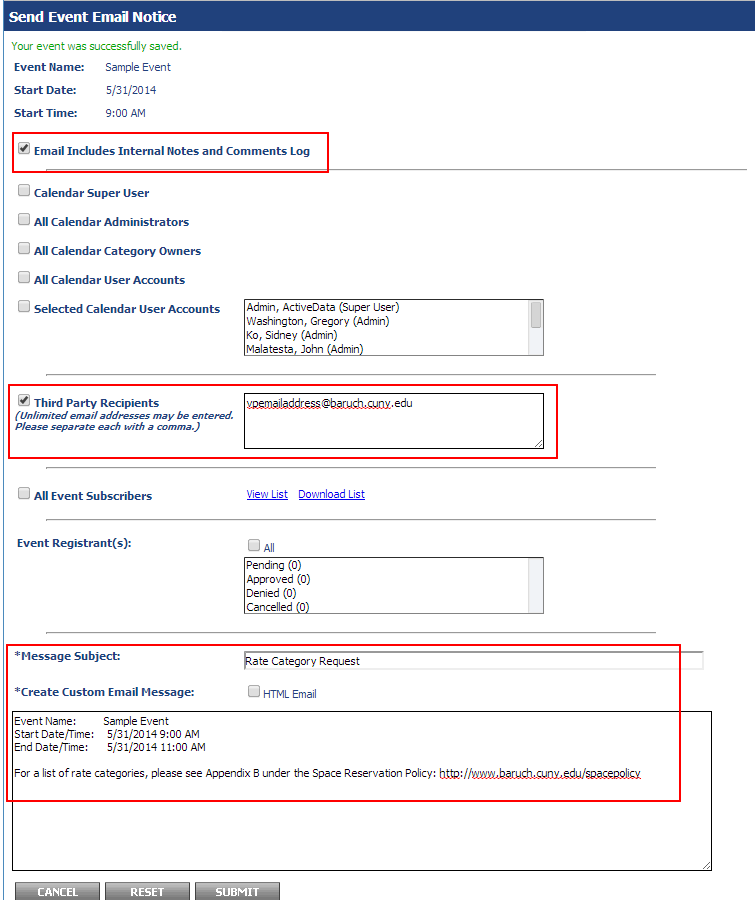
- This will bring you to the "Event Notification" page. On this page, select "Email Includes Internal Notes and Comments Log" and "Third Party Recipients" where you will enter your Dean/VP's email address. Enter "Rate Category Request" for the subject and any additional information into the body of the message then click "Submit".
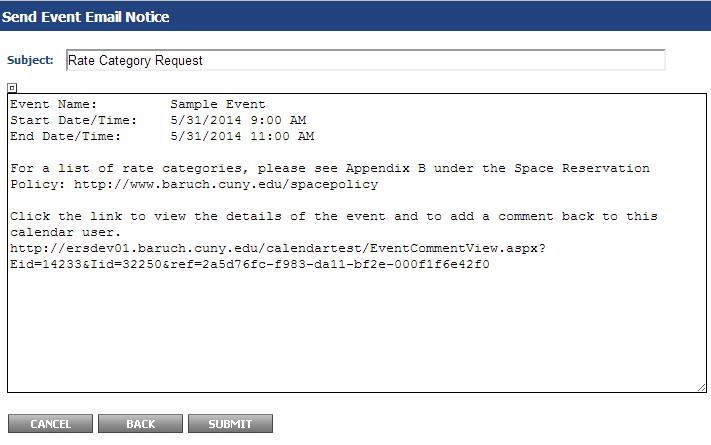
- The following screen will show an overview of the message. Click "Submit" to send the notification to your Dean/VP.
- You are done with the event for now. The Dean/VP will send you the rate category through email (Please see the Space Reservation Workflow - Step 3), where you will then modify your event, put in the rate category, and then select "Release Event" and "Finish" in order to make the facility request to the Space Manager.
If you do not know how to modify your event, see the section below.
Modify/cancel/delete an existing event
If you wish to modify, cancel, or delete an existing event, you may do so by following these instructions.
- In the calendar service, click the "Events" tab
- Click "Events: Modify/Cancel/Delete".
- Select the event from the left-hand list and click "Submit". You can also double-left click the event you wish to modify. If you do not see the event, use the keyword search on the right if you know the event name.

Other useful search options:
Select Events for a Specific Date Range - You can specify the start/end date to show events during this time period.
Save for Current User Login Session - If you expect to modify the same set of events during your current session within the Calendar, saving this will prevent you from having to search for it again for the duration of the session.
Save for all Future Session - If you expect to use this search again in the future, you can save the search by selecting this option and putting in a name for the search. In the future, you can access the same search by using the drop-down menu by "Select Saved Search".
- If you have more than one occurrence in your event (more than one event date), you will see the screen below. You can modify the series or an individual occurrence of the event. When you've selected which set you'd like to modify, click "Submit".

- Modifying the event is similar to adding an event. You can proceed through the tabs and make edits where needed. If you wish to delete or cancel an event, you can select these options on the first tab shown in the image below. When you're done with your edits, just click "Preview" and you can save or release the event.

Removing a room from an event
If you wish to remove a room from an event date, you will click on the "Scheduling & Facilities" tab at the bottom of the page.

Scroll down to the bottom of the page where you will see the "Schedule Facility Booking(s)" area. Click on the room (the tab) you wish to remove and then click "RESET". The room will then be removed. Make sure to click "Preview" and then "Finish" at the bottom right of the screens to finalize your changes.

If you have multiple dates using the room that is being removed, you should modify the occurrence date where the room is not needed and follow the instructions above. You can select an occurrence by following the instructions from the above section "Modify/cancel/delete an existing event"
Changing/Removing Event Date(s) or time for an Event
IMPORTANT - Changing the event date/time for an event date where the room has already been approved will require the Space Manager to approve/deny your request again. The room will be available for others to request until the Space Manager approves your request.
If you wish to change/remove an event date or time for your event, you will click on the "Scheduling & Facilities" tab at the bottom of the page.
You may make your changes on the "Current Schedule" table. If you need to remove a date, you can click the "Delete" link next to the date. Don't forget to click "Preview" and then "Finish" to finalize your changes.

Modifying Events with Registration / Active Registrants
Please follow these instructions if you wish to modify an event that accepts RSVPs on the calendar.
Please note that it is not possible to change the event date, start time, or end time when you have people registered for your event. If you only wish to change the time of the event, it is recommended the registrants are emailed with the new time and the new time can be noted in the event description.
If you need to reschedule the event for another date, it is recommended that you email all registrants and notify them of the new date, cancel the event (which will send cancellation emails to all registrants), and reschedule the event. The registrants cannot be carried over.
When you cancel an event, it will give you an option to reschedule the event. Rescheduling the event will allow you to create the event again with all of the information from the previous event already populated.
*If you delete (not cancel) an event with registrants, all of the registration information will be lost.*

Space Manager (facility owner) Instructions
Approving or Denying a Facility Request for Space Managers
- If you are a Space Manager of a facility, you may receive facility requests for events booked for your facility via email.
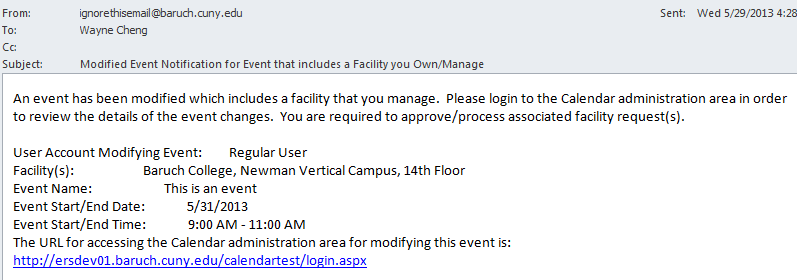
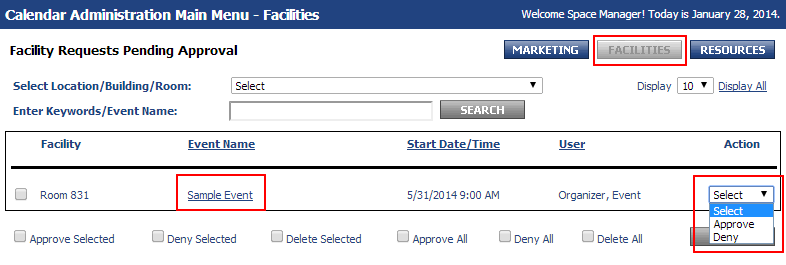
- To view these facility requests, login to the calendar and click the "Facilities" button on the "Main Menu" page.

- To take action on these facility requests, click on either the "Event Name" link to go into further detail for the event or select "Approve" or "Deny" from the Action drop-down for instant approval/denial.
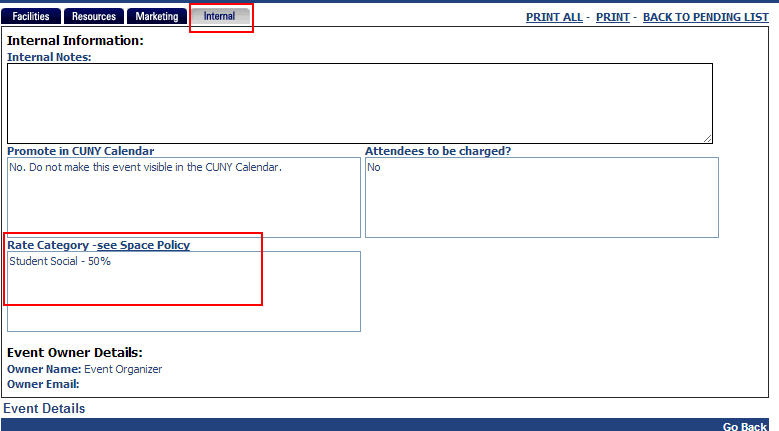
- You should check and verify that a rate category has been set by clicking on the "Event Name" link and then the "Internal" button (highlighted in image below).If the rate category is set to "TBD by Dean or VP" or empty, the request should be denied.
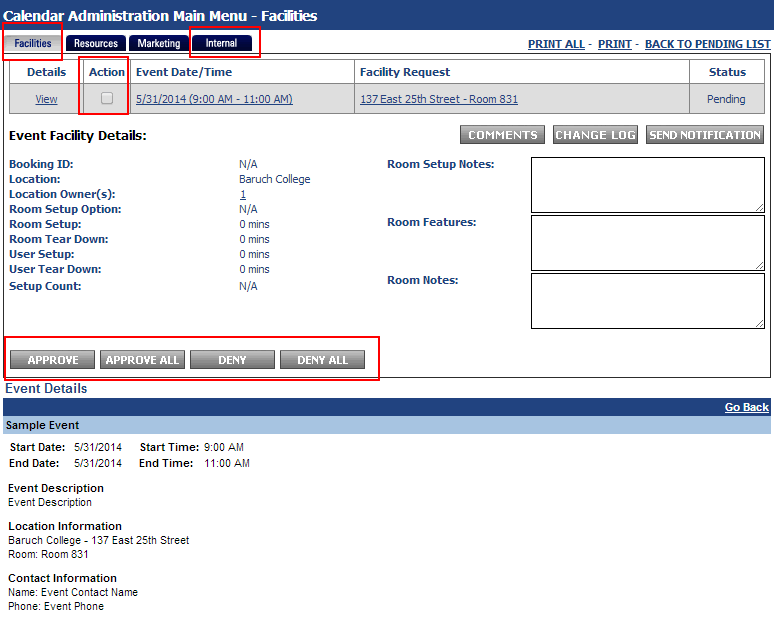
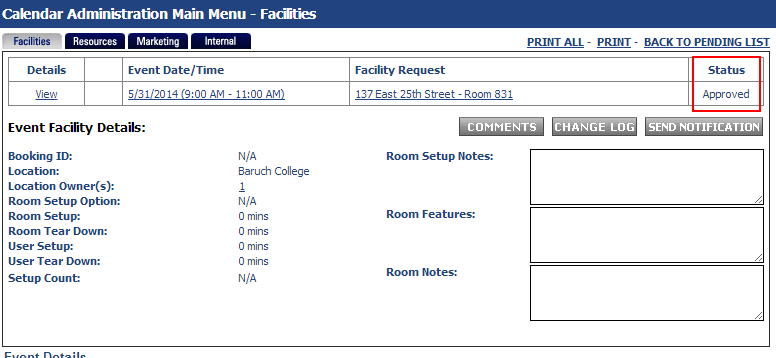
- If you clicked on the "Event Name" link and then the "Facilities" button (highlighted in image below), you will see an overview of the event with options to approve/deny the event. Check the checkbox underneath "Action" and then click approve or deny to take action on the event.
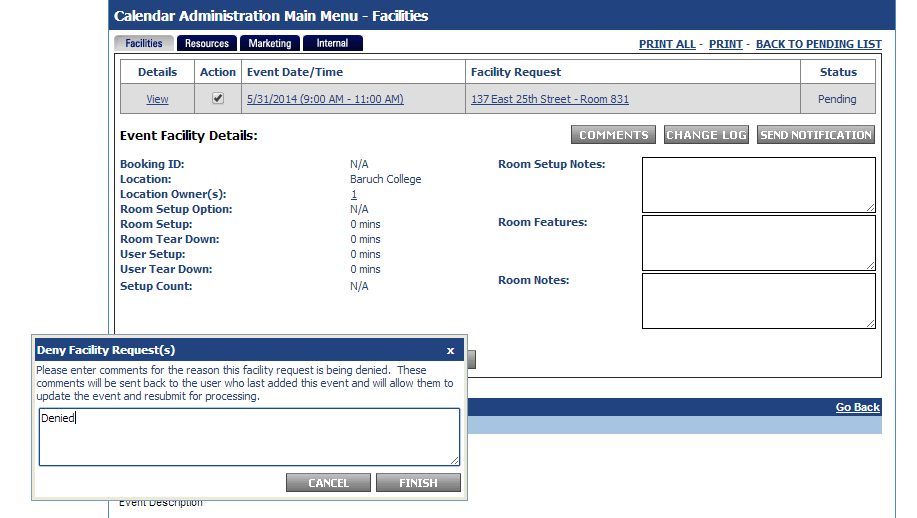
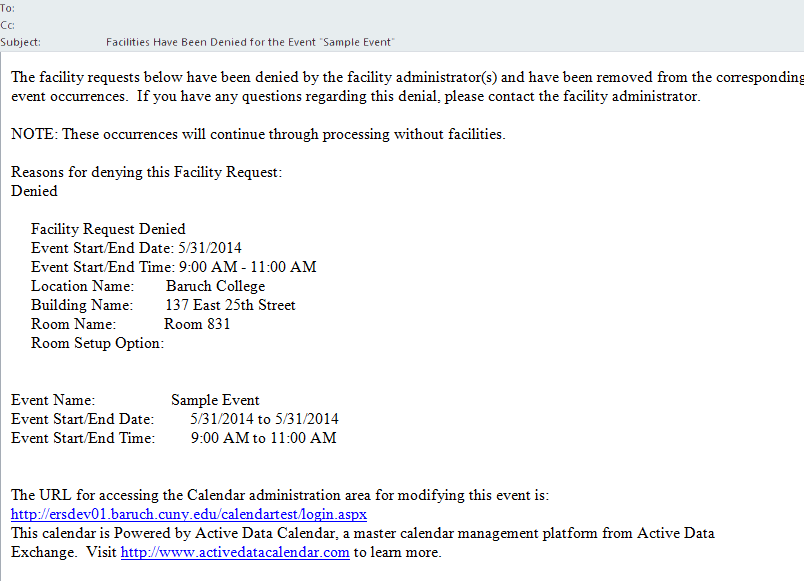
- If you deny an event, you will receive a prompt to indicate the reason for denial. The Event Organizer (submitter of the event) will receive an email with the reason indicated in this window. The facility will also be removed from their event and they will have to initiate a new facility request.
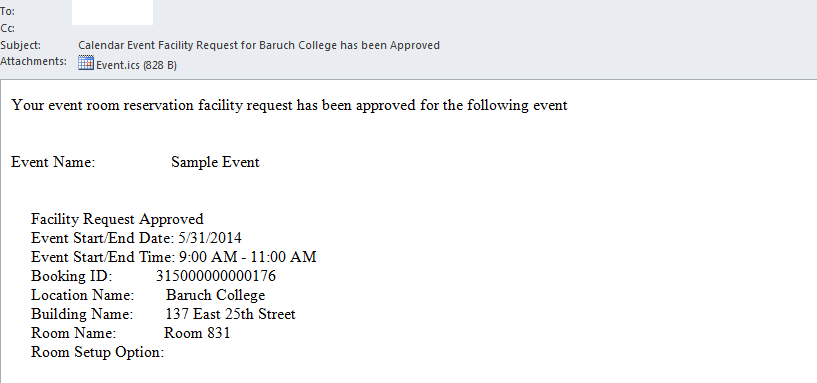
- If you approve an event, the event will be published into the calendar and the facility will be booked for the event. The Event Organizer will receive a message indicating the request was approved.
Facilities Calendar Instructions - Seeing Room Availability
Using the Facilities Calendar to see room availability before adding an event
The Facilities Calendar allows you to see what rooms are available, requested, booked over a series of dates in a gantt chart.
- Click "Facilities Calendar"

- Check off the rooms you wish to see information for within the "Event Location" area

- Fill in your start/end date parameters
- Select your filter option (described below)
- Show All Requested Facilities - Shows all facilities selected that have requests that have not yet been approved
- Show All Booked Facilities - Shows all facilities selected that have requests that have been approved
- Show All Available Facilities - Shows all facilities selected with availability anywhere on the schedule
- Show All Facilities - Shows all facilities selected regardless of availability
- Click "Search"
- Rooms and their availability will be shown on the bottom of the page.

Registration / RSVP Instructions
Add Registration to an Event
If you would like to add a registration form to the event, please follow the steps below.
- On the "Details & Registration" tab when adding/modifying an event, you should see an "Enable Registration" checkbox. If you do not see this, make sure that your event date is set correctly. If it is in the past or day of, it will not allow you to set registration. Check off "Enable Registration" and the options below should appear.

- For "Registration Form Template", it is advised to set up your own template as this allows you to control the different options of the form. If you wish to do this, please see the section below. The standard form has a set of options that cannot be changed. The options are noted in the list below. If these options are satisfactory, then select "Use Standard Form" as the registration form template.
- The standard form sets all registrants to "pending" which means you will have to go into the system and manually approve people who have registered for the event.
- The standard form emails the user who created the event with a notification every time someone registers for the event
- The standard form only asks for the user's first name, last name, and email address.
- For "Registration Rules", this only applies to an event with multiple occurrences (for example, an open house event that occurs every two weeks with registration). The following options are available:
- Single Occurrence Level Registration Only Enforced - a registrant can only register for one occurrence (can only attend one open house)
- Multiple Occurrence Registration Allowed - a registrant can register for all open house events
- Make sure to set the following fields as they are required
- Maximum Registrants - Check unlimited if you do not want a limit. If you set a limit, please be advised that the limit only counts towards registrants who have been approved for the event. If your form automatically approves registrants, they will all count towards this limit. If they are set to pending first, no registrants will be counted for the limit until you go into the registration and approve users.
- Registration Deadline
- Cancellation Deadline - When the user registers for an event, they also receive a link to cancel their registration. This will set a deadline for allowing cancellations
- You can also set the event to display if registration spaces are still available. Setting it to yes will show how many spaces are still available.
- You can ignore the "Additional Registrant Information" as this is not normally used.
- The registration portion is done, you can proceed with other event changes or click "Preview" and finalize the event.
Create a Registration Form Template
- To create a customized registration form, in the calendar service click the "Registration" tab.
- Click "Forms: Add". You will see the screen below.

- Type in the Form Name
- Select "Registration Form without Payment" for Form Type.
- For "Send Confirmation Email", you can opt to send a confirmation email to the user when they register. If you do not wish for them to receive a confirmation email, select "Do Not Send Confirmation to Registrants".
- You will see four boxes with a list of users. To add a user, select the user in the box and then click "Add". Here's what each box does.
- Users/Groups to Assign Form to Events - These are users who can use this form for their events.
- Users/Groups to Receive Registration Emails - Users selected here will receive an email every time someone registers for an event using this form. If you do not wish to receive any emails, it is recommended you add "Admin, ActiveData" to this section with no one else. If you leave this section blank, a registration email will be sent to the user who created the event using this form.
- Users/Groups to Process Form Registrants - Users added here will be able to add/delete/approve/reject users who register.
- Users/Groups who can Modify/Delete Registration Form - Users added here can modify this form template or delete it.
- After you are done with this section, click "Next". You will see the screen below.

- "Set New Registrants" allows you to set users to either approved or pending. If you set users to pending, you will have to approve them in the system when users register for an event.
- You can send an email reminder to people who have registered for your event with a time you specify.
- The form text area allows you to change the wording on the registration form for the event.
- The email text area allows you to change the wording on the various emails sent out to registrants. The different types of emails are as follows
- Registration Confirmation - This email is sent to users when the form is configured to set new registrants as pending (requiring approval). This email does not get sent out if you have the form configured to automatically approve users.
- Registration Approved - This email goes out as the first email if the form is set to automatically approve registrants otherwise it is sent out after you've manually approved a registrant.
- Registration Denied - Sent out when you deny a registrant in the system
- Registration Deleted - Sent out when you delete a registrant in the system
- Registration Cancelled - Sent out when a user cancels their registration or when you cancel the event which automatically sends out a cancellation email to all registrants
- Registration Reminder - Sent out if you have the email reminder function checked off
- You can set a "From" email address by filling out the "Send emails from" field. If this is blank, the from email address will be from the user who created the event.
- Click "Next" when you're done. You will see the screen below. This is where you can specify the fields the user sees when registering for the event.

- As a default, the first name, last name, and email address will always be requested in the form. If you only want these three fields then you do not need to select anything on the screen and can proceed by clicking "Next".
- Selecting "All Standard Contact Fields (Domestic)" or "All Standard Contact Fields (International)" will include all fields displayed on the screen. This includes the following fields: Company, Job Title, Address (Domestic/International format depending upon what you selected for "All Standard Contact Fields"), Phone, and Fax.
- If you only want some fields from this screen, check them off. If you wish for "Job Title" to be required, then check off the required checkbox next to the field. If you do not wish to add a custom field, just click "Next" to proceed.

- If you want to add a field (custom) that is not shown on this screen, click the drop-down menu next to "Field Type" in the "Additional Fields" section. Select the field type that works best for your field.
- Checkbox - A field where multiple values can be selected/are true. For example, the field "Which CUNY Schools have you visited?" could have multiple choices that would be applicable.
- Comma Separated Text Field - Allows users to enter different values separated by comma into a text field (rarely used)
- Dropdown - Similar to radio button, but the interface is a drop-down menu. This is useful for fields with a large amount of choice but only allows the user to pick one (such as what state the registrant is from).
- Radio Button - Similar to dropdown, but all of the answers are displayed on the screen instead of in a drop-down menu. This is preferred for questions with a small amount of choices such as gender of the registrant where the user can only pick one choice.
- Text Area - Similar to text field, but allows for more text. This should be used when the user is expected to type more than one line of text.
- Text Field - Similar to text area, but should be used for one line text. This could be a field where a phone number is requested or how many guests the user is bringing to the event.
- Date Selector - This is a text field, but with a button that displays a calendar with dates to select from. This should be used for anything using a date such as birth date of the registrant.
- Once you've selected a custom field type, there are some parameters to fill in. We'll go over them below. Some of the field types have very similar parameters so they are lumped together below.
- Checkbox, Dropdown, and Radio Button Field Types

- Field Label - This is the text that will show up on the form itself and be visible to the registrant. You can check off "Required" here to make this whole field required for submission.
- Field Identifier - This is an arbitrary identifier for the form and is only handled on the back-end. It is recommended you put something that describes what this field is (for instance, gender).
- Checkbox/Dropdown/Radio Selection Options - These are the choices provided to the user for this field. Please enter every new value on a new line.
- Allow Write-In Response - Allows user to put in a response not shown in the list
- Selection Display (Checkbox / Radio only) - Controls whether the answers are shown vertically or horizontally.
- # Per Column - How many answers to show per column
- CS Text Field, Text Area, Text Field

- Field Label - This is the text that will show up on the form itself and be visible to the registrant. You can check off "Required" here to make this whole field required for submission.
- Field Identifier - This is an arbitrary identifier for the form and is only handled on the back-end. It is recommended you put something that describes what this field is (for instance, gender).
- Max Characters - It is not necessary to fill this out, but this is the amount of characters the user can put in.
- Field Data Type - This allows you to restrict the input to either alphabet/numbers/alpha-numeric
- Width - You can specify how wide you want the field to be, but it is not required
- Height (Text Area only) - You can specify how long you want the field to be, but it is not required
- Date Selector

- Field Label - This is the text that will show up on the form itself and be visible to the registrant. You can check off "Required" here to make this whole field required for submission.
- Field Identifier - This is an arbitrary identifier for the form and is only handled on the back-end. It is recommended you put something that describes what this field is (for instance, gender).
- Start Date - Allows you to set the earliest date on the calendar popup button
- End Date - Allows you to set the latest date on the calendar popup button
- Once you are done setting these parameters, you can click "Preview" to see a preview of your newly created custom field or click "Add" to add it to the form. It will not be displayed on this screen when you add it, but will be shown on the preview screen. Click "Next" to proceed to that screen.
- After you've clicked next, you're now shown a preview of the form itself.

- You don't have to do anything on this screen, but do verify all the fields you selected/added are shown, and then you can click "Finish". You're now done and should be able to add/modify an existing event and use this form for registration.
Managing Registrants
- In the calendar service, click the "Registration" tab
- Click "Registrants: Active". You will see the screen below.

Download CSV Export for Event
- Follow steps for "Managing Registrants" above
- If you wish to get a CSV export with the registrants, click "Download" on the right side of the screen for the event.
Increase/Decrease Maximum Registrants for Event
- Follow steps for "Managing Registrants" above
- If you click the link with the number of maximum registrants, this will allow you to increase/decrease registrants for this event.
- You cannot decrease the number of registrants to an amount lower than the number of people registered for your event. If you have 8 people registered, you can only set this number to 8 at the lowest which effectively closes registration since the maximum number has been met.
Approve / Deny / Cancel Registrants from Event
- Follow steps for "Managing Registrants" above
- If you click the link with the number of pending, approved, denied, or cancelled registrants, this will show you a list of registrants with the specified status for that event. This screen is shown below.

- To change the status of only one registrant, click the drop-down menu under "Action" for the individual's row and select an action (approve/deny/delete/cancel). After selecting the action, the calendar service will automatically perform the given action.
- To change the status for multiple individuals, but not all, check the "Change Status" checkbox next to their name. Then click the action (approve/deny/delete/cancel) next to "SELECTED:". Click "Submit".
- To change the status for all listed, click the action (approve/deny/delete/cancel) next to "ALL:". Click "Submit".
Email Registrants from Event
- Follow steps for "Managing Registrants" above
- If you click the link with the number of pending, approved, denied, or cancelled registrants, this will show you a list of registrants with the specified status for that event. This screen is shown below.
- To email registrants, either click "Select all" if you wish to email all registrants or click the individual's checkbox under "Email". Click "Submit". The email screen is shown below.

- You should see the registrants' emails in the textbox labeled "Third Party Recipients". You may add additional email addresses if you wish.
- Fill out the "Message Subject" and the body labeled "Create Custom Email Message". When you're ready to send the email to your registrants, click "Submit". The next screen will show you a preview of your message. You can click "Submit" again to send the email.
Marketing an Event Instructions
Creating a link to a specific event for distribution
If you wish to send a link to users to a specific event, please follow the steps below:
- Go to the Baruch Calendar (http://wwww.baruch.cuny.edu/calendar )
- Find your event on the calendar and click on it. You should see the screen below after doing so.

- In the address bar (highlighted in blue at the top of the image), copy this URL/address. This is the link that you can distribute to users to see your event specifically in the calendar.
Creating a link to a set of events for distribution
If you wish to create a link to a set of events to distribute to users, such as all of your open houses, please follow the steps below.
- In the calendar service, click "Marketing" tab
- Click "Generate: Quick Link". You will see the screen below.

- Let's go over the view type which controls how your set of events will be displayed in the calendar. Options detailed below. It's recommended that you use "Summary" as the view type, but you can choose from one below.
- Grid - Shows events in a grid

- Category - Shows events in a list, organized in sets by category

- DateTime - Shows events in a list, organized in sets by Date/Time – Similar to Summary view, but shows some description text of the event and the time is listed in the left-column

- Location - Shows events in a list, organized in sets by location

- Summary - Show events in a list, organized in sets by Date/Time - Similar to DateTime, but shows minimal information for the event (Image of Event (if any), Event Title, Start-End Time, Location)

- Gantt - Shows events in a gantt chart

- Look through the other options to find out the settings you want. For example, if we want to only show events for Open House events from the Accountancy department from the current day up to next year, we would do the following:
- Category(s)/Subcategory(s) - Select "Open Houses"
- Schools/Departments - Select "Accountancy"
- Check off "Current Date to # of Days" and type in 365
- When you are done, click "Submit". Scroll up and you will see a new window labeled "Retrieve Quick Link". Copy this link, this will be the link you distribute to the users.
