Below is a short overview of wikis and Confluence and a basic user training guide for completing common tasks in Confluence. This document outlines the basic features that most of you will want to know to post and share content.
Confluence 5 Upgrade - Changes
Redesigned Header
The Confluence header has been updated and consolidates a number of options into one location:
- Confluence - Returns you to the Dashboard
- Spaces - Lists the recent spaces visited and the Space Directory
- People - People Directory
- Browse - Look though pages, blogs, and labels
- Create - Add pages and blog posts
- Help Icon
 - presents links to online help, keyboard shortcuts, and other useful pages
 - Workbox - Open Notifications
- User Options - represented by your profile picture instead of your name, gives access to your personal settings
Creating Content
The 'Add' option has disappeared from the top of pages and from the dashboard. Instead, Confluence 5 offers a Create option in the Confluence header.
Previously: 'Add' button on page
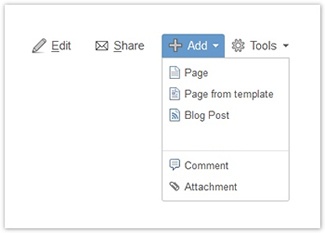
'Create' in the Confluence header, for creating a page or blog post
View more information on creating a new page.
Wiki and Confluence Overview
What is a Wiki?
- A wiki is a website that makes it easy for anyone to contribute pages, and link them together.
- "Wikis in Plain English" video
What is Confluence?
- Confluence is an enterprise wiki. It incorporates functionality appropriate for multiple users and groups, with fine grain permission capabilities so you can choose who can view, create and comment on spaces and pages, and a WYSIWYG editor for content contribution.
- Overview of Confluence video
Complete Confluence User Guides
Common Tasks in Confluence
- Accessing Confluence Wiki
- Navigating through Confluence Wiki
- Working with Pages(Adding/Editing Pages, Attachments, Linking, Comments, Permissions)
- Working with News/Blogs
- Tracking Updates
- User Profile
Accessing Confluence Wiki
Access to Confluence requires an internet connection and browser
- Go to http://www.baruch.cuny.edu/wiki
- Enter your Network Username and Password (this is the same information you use to login to your computer)
Navigating through Confluence Wiki
- Spaces - In Confluence, content is organized into spaces. Each space has its own pages, news items, comments and access permissions. Spaces can based on any theme or topic. Confluence treats each space as an independently managed wiki. This means that each space functions autonomously within your site.
- Dashboard - The Dashboard is the front page of Confluence. It provides an overview of the site, access to all of the spaces you have view access, and a list of the most recent content updates. Read more about the Dashboard
- Search - A search box, located on every page in the wiki, allows you to search Confluence wherever you happen to be in the site. By default, Confluence will search all content in all spaces (global and personal), including attachments, that you have access to view. Read more about searching and filtering results
- Browse - Within a space, the 'Browse' menu, gives access to wiki content such as pages, news items, etc, and allows you to browse the People Directory. If you are an administrator, the space and site administration options appear here too.
- See more about these items in the Official Confluence Getting Started Guide
Working with Pages
Pages are the main building blocks of the wiki. You will use pages to organize your content into lower-level groups. You should create a new page whenever you want to create a whole new category of content or discussion, if you want to add a set of related content that makes sense to group together in one place, or if you want the content to be accompanied by a longer description and it would take what feels like too much space on an existing page. Once a page exists, you must link to your page from at least one other page so that people can find it. Then you can link to it from as many other pages as you would like as well.
Adding a New Page
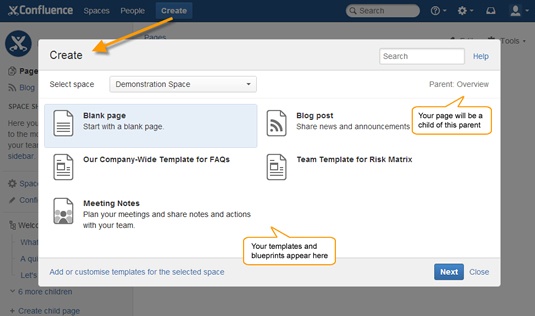
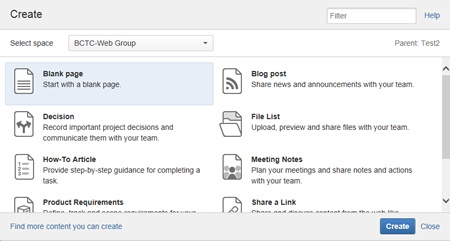
- Select 'Create' in the Confluence header, as shown above
- Select the Space in which the page will reside
- Choose the type of page to create - Blank page is the default
- Select the 'Create' button on the bottom of the dialog box
- By default, Confluence will add the new page as a child of the page you are viewing. View the "breadcrumbs" under the Confluence header for your page location. If you need to move the page to a different space or a different parent, you can edit the page location by selecting 'Location' at the bottom of the page.
- Enter a name (title) for your page. This is how it will be referred to from other pages.
- Enter content for your page and style it using the Rich Text editor box below the title.
- Select 'Preview' to preview the page before saving it.
- Select 'Save' to save the page
Editing a Page
- Go to the page and click on the 'Edit' link. This will bring up the edit screen.
- Make changes to the content or add new content as you would when you create a new page.
Click 'Preview' to view your changes, and click 'Save' to keep them. Confluence will auto save a draft periodically, but we suggest that you save often, especially when adding a lot of content.
Deleting pages
- Go to the page and click on the 'Tools' link.
- Click on the 'Remove' link located at the bottom of the 'Tools' menu.
Adding an attachment
An attachment is any file that is included with your page. Images, word documents, presentations, PDFs, multimedia and sound files are some examples of attachments. Attachments are useful when you want to share information that exists in another file format. in confluence you can attach files to any page.
If you attach a file with the same name as an existing attachment, Confluence will create a new version of the existing attachment.
Adding an Attachment and Link to it at the Same Time
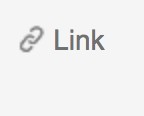
- From the page and location you wish to link from, click on the 'Link' button on the toolbar (the one that has two chain links). A pop-up screen will appear.
- In the pop-up screen, click on the tab labeled "Files" To add a new file, click on the "Choose File" button to get to files on your computer, and select the appropriate file.
- After selecting the file, it will automatically upload and show up in the list of attachments on the same screen. This is a list of all the attachments to that particular page.
- Change the "Link Text" if needed
- When ready, click the "Insert" button at the bottom of the pop-up screen.
Quick instructions: Choose "Link" Button
 > Choose Files > Click Choose file (to select a files) > Then update the link text as needed > Click insert
Adding an Attachment to a Page for Future Linking
- Go to a page in the space, open the 'Tools' menu and select 'Attachments'. The 'Attachments' view will open.
- Click the 'Choose File' button.
- Browse through your files and select the file you'd like to attach.
- Enter a description for the attachment in the 'Comment' text field (optional).
- Click 'Attach more files' if required.
- Click 'Attach'.
Once you attach a file, you can then provide a link to it from a Confluence page (see linking below). When a user clicks on the link, the attachment will open, so long as the user has the software application needed to open the attachment. In the case of image attachments, Confluence allows you to display attached images on the page.
Commenting on a Page
A comment is a remark, question, or any other additional information you wish to add to a page pertaining to the topic the page covers. Comments are a means by which a community of users can interact with each other on the site.You can leave a comment on any page or news item in Confluence.
Comments on pages will appear by default in threaded form, below the page content. If the comment author is a Confluence user, a link appears to their profile page. The time of the comment's last edit is also displayed - you can mouse-over the time to see the date and time it was posted.
To add a new comment
- Click the 'Add Comment' link near the bottom of the page.
- The comments box opens up. Type in your text.
- Click the 'Preview' tab to see a preview of your comment.
- You can tick the box next to 'Watch this page' to receive email alerts whenever the page is commented or edited.
- Click the 'Save' button to save your comment and display it on the page.
To respond to a comment
- Click the 'Reply' link located below the text of a comment.
- This will open up a new comment box. Type in your text.
- You can tick the box next to 'Watch this page' to receive email alerts whenever the page is commented or edited.
Click 'Save'.
links
To delete a comment
'Remove Comments' needs a permission from a Space Administrator. Once you have the permission then 'Remove' button will display at the bottom of page next to add comment button.
- Go to the page that contains the comment.
- Click Remove at the bottom of the comments box.
Warning - Deleted comments cannot be restored.
Linking ( Hyperlink)
You can create links to anywhere within Confluence (pages, news items, comments, attachments) or an external web site.
Linking to another page in Confluence
- From the page and location you wish to link from, click on the 'Link' button on the toolbar (the one that has two chain links). This will open up the 'Insert Link' window.
- Click on 'Recently Viewed' to select the page you want to link to.
or
Do a 'Search' for the page using the search facility and select a page from the search results. - In the field called "Link Text" enter the words you wish to appear to represent the link on the actual page. For instance, you might type "here is the latest report," or simply the document's title. The link can appear on its own or in the middle of a paragraph, and may simply be part of a sentence.
- Another way to enter the words that will form the link is to highlight the words in the edit window before clicking the 'Link' button. These words will automatically appear in the "Link Text" field and all you have to do is enter the Wiki page name.
- Click 'OK'.
Linking to an external web site
- From the page and location you wish to link from, click on the 'Link' button on the toolbar (the one that has two chain links). This will open up the 'Insert Link' window.
- Click on 'Web Link' tab.
- Enter the URL of the webpage in the text-entry field and click 'OK'.
Anchoring
The Anchor macro allows to link to specific parts of a page. Anchor links can be especially useful when navigating between sections of a long document or to link to a segment of a page and not to the page as a whole.
Anchors are invisible to the reader when the page is rendered.
There are two steps to using an anchor:
- Create the anchor for the content.
- Create the link to the anchor.
Creating an Anchor
To add the Anchor macro to a page:
- In the Confluence editor, choose Insert the Other Macros.
- Click on Anchor macro
- Macro placeholder will pop up and insert any name to anchor link box.
Linking to an Anchor or Heading
Anchor can be created as heading on the same page, on another page in the same space, or on a page in another space of the same Confluence site.
To link to an anchor or heading:
- Click Link in the toolbar, or press Ctrl+K, while editing the page.
- Click Advanced and enter the anchor name (or heading) into the Link box, using the following syntax:
Anchor or heading location | Link syntax for anchor | Link syntax for heading |
|---|---|---|
Same page |
|
|
Different page |
|
|
Page in another space |
|
|
For more information about link syntax, see Confluence Wiki Markup.
3. Enter link text that will be displayed on the page, if required. If the Link Text box leave as empty, the link will display the destination page name or URL.
4. Click Insert.
- Note that when linking to a heading, headingname is case-sensitive and must be entered without spaces
- Note that when linking to an anchor, anchorname is case-sensitive, and pagename must be entered with spaces as in the title.
Page permissions and restricting access (hiding a page)
Page restrictions control who may view or edit a specific page, within the bounds of the space permissions. This gives the space administrator control over who can access their space, and within that the page editor can control access to the page.
- Viewing restrictions make the page invisible to everyone except the chosen users/groups.
- Editing restrictions prevent everyone except the chosen users/groups from editing the page.
To set 'viewing' restrictions on a page
- Click the 'Tools' link at the top of the page and then click "Restrictions" or click "Edit" and then "Unrestricted" or "Restricted" at the lower left corner of the editor.
- A pop-up will appear allowing you to edit the restrictions. The option 'Restrict viewing of this page' will be selected by default.
- Choose the appropriate user(s) and/or group(s) who you want to allow to view the page:
- To choose just yourself, click 'Me'.
- To choose a particular user, you can either:
- If you are unsure of the user's exact name, click "Person" and the 'User Search' popup window will appear. Use the search options to find the required user. Select the appropriate user(s), then click the 'Select user(s)' button. (You can read more about searching for users.)
- Type the user's name (or a list of names, separated by commas) into the 'Enter user/group name(s)' box, then click the 'Restrict' button.
- To choose a particular group(s), you can either:
- If you are unsure of the group's exact name, click 'Groups' to display the 'Group Search' popup. Type part of the name, then click the 'Search' button to display a list of matching groups, e.g. to search for groups whose names start with 'finance', type 'finance'. Select the appropriate group(s), then click the 'Select group(s)' button.
- Type the group name (or a list of groups, separated by commas) into the 'Enter user/group name(s)' box, then click the 'Add' button.
- Click the 'Save' link at the bottom of the page.
To set 'editing' restrictions on a page
- Click the 'Tools' link at the top of the page and then click "Restrictions" or click "Edit" and then "Unrestricted" or "Restricted" at the lower left corner of the editor.
- A pop-up will appear allowing you to edit the restrictions. Select 'Restrict editing of this page'.
- Choose the appropriate user(s) and/or group(s) that you want to allow to edit the page, as described for 'viewing' restrictions above.
- Click the 'Save' link at the bottom of the page.
Working with the Meeting Notes Blueprint
The Meeting Notes blueprint helps you to plan your meetings and share notes and actions with your team.
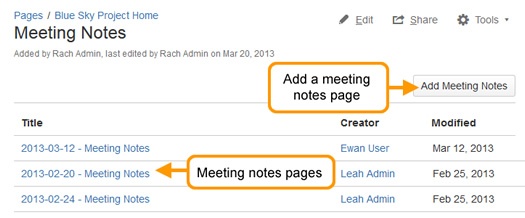
The first time you use the Meeting Notes blueprint in a space, Confluence will create an index page and add a shortcut on your space sidebar (if you are using the default theme). The index page lists the latest Meeting Notes pages in that space.
Screenshot: Index showing three Meeting Notes pages.
To use the Meeting Notes blueprint:
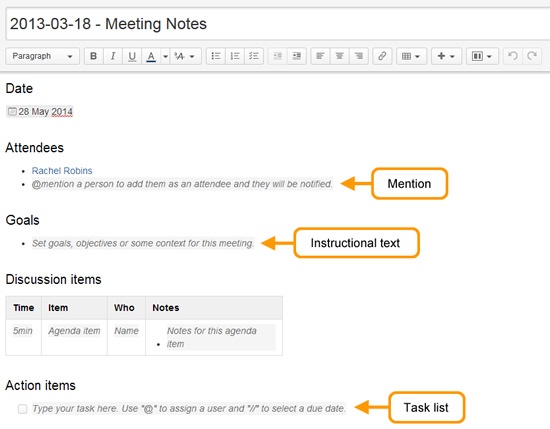
- Create a Meeting Notes blueprint page (choose Create > Meeting Notes).
- Enter goals, agenda items, @mention attendees - the instructional text will prompt you.
- Save your page and get ready to attend your meeting.
- During or after your meeting edit the page and enter your notes, action items and @mention users to assign them to tasks.
Screenshot: A blank Meeting Notes page showing instructional text.
Working with Tasks
Using a task list with the ability to give each task an assignee and due date, helps you to keep track of things that need to get done.
To create a task:
- In the editor choose the Task list button
- Start typing your task:
- use @ to assign the task to someone - the first person you mention in a task is the assignee
- use // to choose a due date (dd/mm/yyyy)
Example: @ John Paul contact each vendor for their product description 18 Nov 2014 –
John Paul has been assigned the task of getting the product information from the vendors by Nov 18, 2014.
You can mention more people in the task, but the first person mentioned will be the assignee - you can assign tasks to yourself also.
There are a number of ways to keep track of tasks assigned to you, or tasks you've created for others.
On a page
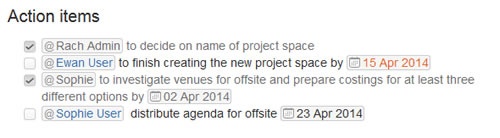
The simplest way to see a task is on the page it was originally created on, for example the Action items in a meeting notes page.
It is easy to see if a task is complete, who it is assigned to, and when it is due. If a task is nearing, or has passed its due date, the color of the date will change (red for overdue, orange for due in the next 7 days).
Screenshot: Tasks created on a meetings notes page
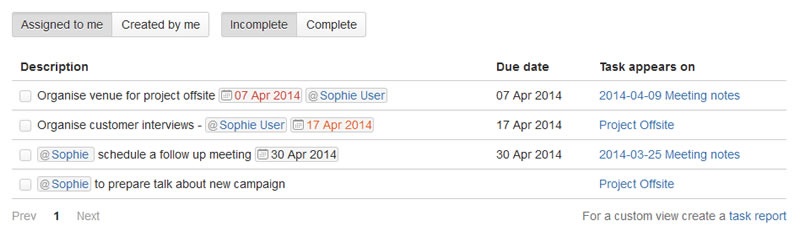
In your profile
The tasks page in your profile gives you a place to see all the tasks relevant to you in one place. Easily keep track of the status of tasks assigned to you, and tasks you've created and assigned to others.
To view the tasks page, go to Profile > Tasks.
Use the filters to show tasks that were assigned to you or created by you and toggle between complete or incomplete tasks.
Screenshot: Task page - Incomplete tasks assigned to me (Sophie)
In a Task Report
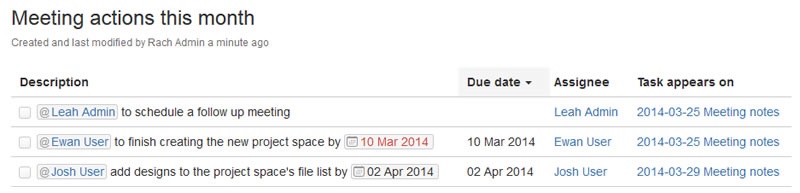
If you're looking for a more custom view of tasks, the Task Report blueprint is a great way to track tasks assigned to a specific team or project.
To create a task report:
- Choose Create > Task Report
- Select the type of report:
- Assigned to my team for tasks assigned to particular people
- In my project for tasks that appear in a specific space or page, or
- Custom for a wide range of filtering options, including by date or page label.
- Follow the prompts to create the report.
This blueprint uses the Task Report macro. You can also choose to use this macro on an existing page, for example, on a project or team space homepage.
Screenshot: Task Report for a particular month
Working with News/Blogs
Each space in Confluence can publish its own news. News items may be announcements, journal entries, status reports or any other timely information you would categorize as 'news' pertaining to a space. News items are also known as 'blog posts'.
Viewing news
- Click on the 'Browse' link and then click 'Blog' for the space. This is located at the top of every page and beside the space link on the dashboard.
Adding news
- Click the 'Add' link located at the top of every page in the space and then click on 'Blog Post'. This will bring up the editor.
- Enter a title for your news item in the 'New Blog Post' text field at the top.
- Enter your content in the text-entry box as you would for any other page in Confluence.
- If you want to backdate your news item, click 'Posting Date' and select a past date.
 You can set the date to earlier than today, but you cannot set it to a future date. And you can only change the date when creating the news item, not when editing a news item.
 - Preview and click 'Save'.
Tracking Updates
You can keep track of changes to a single page, an entire space, or to all spaces on your site.
Watching a Page
When you watch a page, you are notified by email whenever the page is modified.
- Go to the page.
- Click the Watch link in the menu at the top of the page.
- Select the to 'Watch page' or 'Watch all content in this space'.
Watching a Space
When you watch a space, you are notified by email whenever content is added to it or updated.
- Go to a page in the space.
- Click the Watch link in the menu at the top of the page.
- Select 'Watch all content in this space'.
When you subscribe to the daily report, you will be sent an email with a summary report of changes in all spaces visible to you.
- Go to your name at the top of the page. (This is the 'User' menu. A dropdown list will appear when your cursor hovers over the 'User' menu.) Select 'Settings' from the drop down list. The 'Settings' view will open.
- Click the 'Email' link in the left-hand panel.
- Click the 'Edit' button.
- Check the box beside 'Subscribe to daily updates'.
- If you want to receive a notification each time you add or edit content on Confluence yourself, check the box beside 'Notify on my actions'. If you leave this box unchecked, you will receive notification of other people's actions but not of your own.
- Click 'Submit'.
User Profile
Each user in Confluence has a user profile. Your profile contains your personal details, photograph (optional), group membership, site preferences, email notification preferences and user statistics. To find your profile:
Go to your name at the top of the page. (This is the 'User' menu. A dropdown list will appear when your cursor hovers over the 'User' menu.) Select 'Settings' from the dropdown list. The 'Settings' view will open.
Name and Email are not editable in your user profile. This information reflects the name and email on record in Active Directory
Confluence Screenshots, Atlassian, Source (https://confluence.atlassian.com/display/DOC/), CC 2.5