...
- On the "Details & Registration" tab when adding/modifying an event, you should see an "Enable Registration" checkbox. If you do not see this, make sure that your event date is set correctly. If it is in the past or day of, it will not allow you to set registration. Check off "Enable Registration" and the options below should appear.

- For "Registration Form Template", it is advised to set up your own template as this allows you to control the different options of the form. If you wish to do this, please see the section below. The standard form has a set of options that cannot be changed. The options are noted in the list below. If these options are satisfactory, then select "Use Standard Form" as the registration form template.
- The standard form sets all registrants to "pending" which means you will have to go into the system and manually approve people who have registered for the event.
- The standard form emails the user who created the event with a notification every time someone registers for the event
- The standard form only asks for the user's first name, last name, and email address.
- For "Registration Rules", this only applies to an event with multiple occurrences (for example, an open house event that occurs every two weeks with registration). The following options are available:
- Single Occurrence Level Registration Only Enforced - a registrant can only register for one occurrence (can only attend one open house)
- Multiple Occurrence Registration Allowed - a registrant can register for all open house events
- Make sure to set the following fields as they are required
- Maximum Registrants - Check unlimited if you do not want a limit
- Registration Deadline
- Cancellation Deadline - When the user registers for an event, they also receive a link to cancel their registration. This will set a deadline for allowing cancellations
- You can also set the event to display if registration spaces are still available. Setting it to yes will show how many spaces are still available.
- You can ignore the "Additional Registrant Information" as this is not normally used.
- The registration portion is done, you can proceed with other event changes or click "Preview" and finalize the event.
Create a Registration Form Template
- To create a customized registration form, in the calendar service click the "Registration" tab.
- Click "Forms: Add". You will see the screen below.
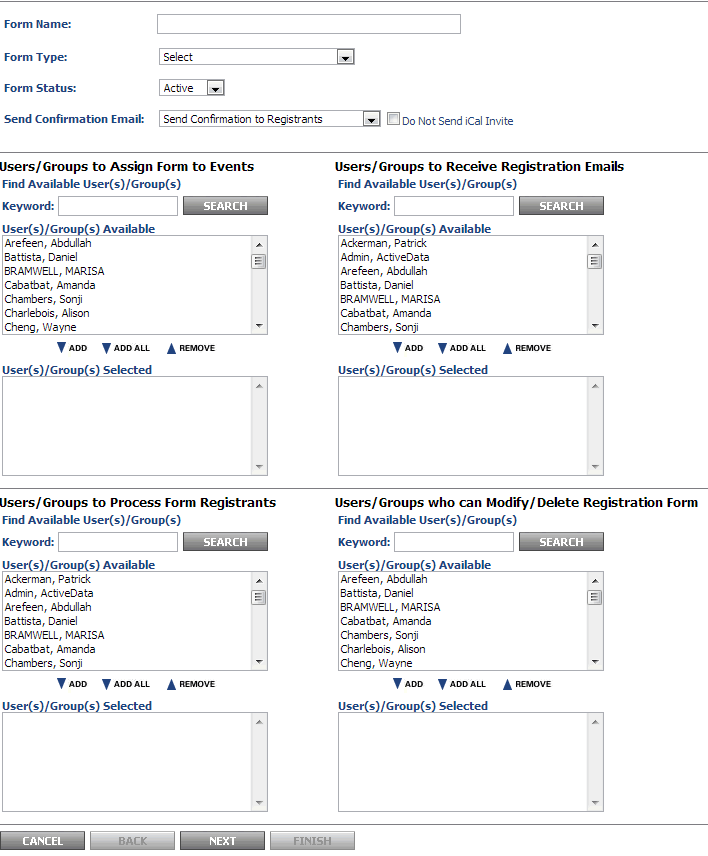
- Type in the Form Name
- Select "Registration Form without Payment" for Form Type.
- For "Send Confirmation Email", you can opt to send a confirmation email to the user when they register. If you do not wish for them to receive a confirmation email, select "Do Not Send Confirmation to Registrants".
- You will see four boxes with a list of users. To add a user, select the user in the box and then click "Add". Here's what each box does.
- Users/Groups to Assign Form to Events - These are users who can use this form for their events.
- Users/Groups to Receive Registration Emails - Users selected here will receive an email every time someone registers for an event using this form. If you do not wish to receive any emails, it is recommended you add "Admin, ActiveData" to this section with no one else. If you leave this section blank, a registration email will be sent to the user who created the event using this form.
- Users/Groups to Process Form Registrants - Users added here will be able to add/delete/approve/reject users who register.
- Users/Groups who can Modify/Delete Registration Form - Users added here can modify this form template or delete it.
- After you are done with this section, click "Next". You will see the screen below.
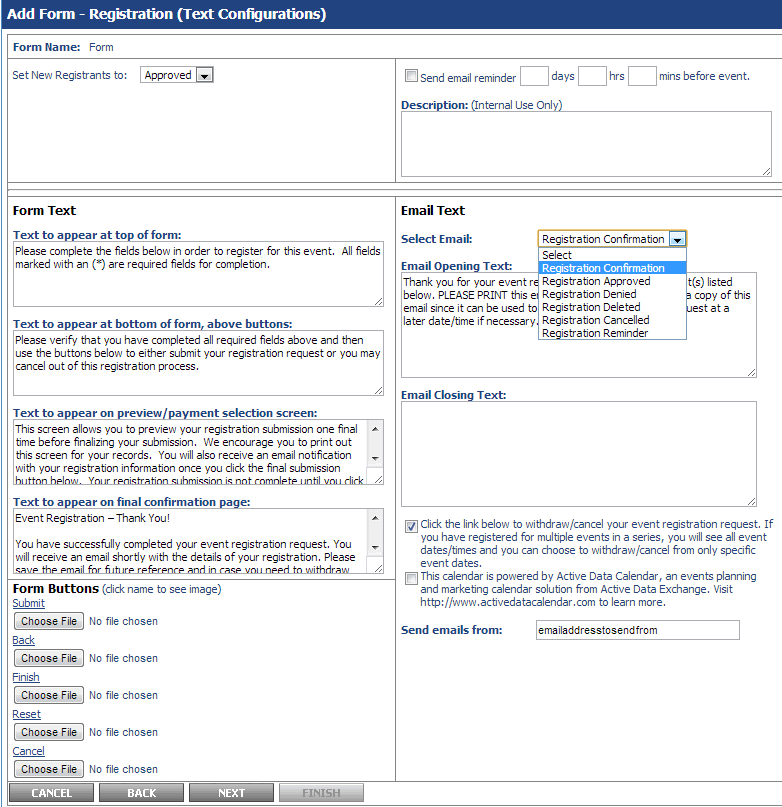
- "Set New Registrants" allows you to set users to either approved or pending. If you set users to pending, you will have to approve them in the system when users register for an event.
- You can send an email reminder to people who have registered for your event with a time you specify.
- The form text area allows you to change the wording on the registration form for the event.
- The email text area allows you to change the wording on the various emails sent out to registrants. The different types of emails are as follows
- Registration Confirmation - This email is sent to users when the form is configured to set new registrants as pending (requiring approval). This email does not get sent out if you have the form configured to automatically approve users.
- Registration Approved - This email goes out as the first email if the form is set to automatically approve registrants otherwise it is sent out after you've manually approved a registrant.
- Registration Denied - Sent out when you deny a registrant in the system
- Registration Deleted - Sent out when you delete a registrant in the system
- Registration Cancelled - Sent out when a user cancels their registration or when you cancel the event which automatically sends out a cancellation email to all registrants
- Registration Reminder - Sent out if you have the email reminder function checked off
- You can set a "From" email address by filling out the "Send emails from" field. If this is blank, the from email address is *** COME BACK TO THIS AND CONFIRM COME BACK TO THIS AND CONFIRM
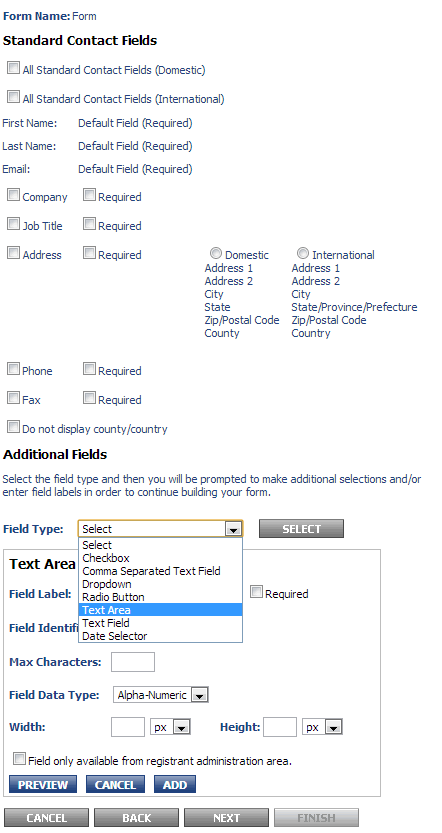
- Click "Next" when you're done. You will see the screen below. This is where you can specify the fields the user sees when registering for the event.